Thursday, August 27, 2020

Solar hot water

Sometimes you don't know something exists until you need it.  When we started looking for a solar water heater we saw a couple different systems, but we really thought the Sunbank residential solar water heater was the perfect solution.  Having dealt with the company for a few months now I can attest that the customer service is excellent and James, who appears in their YouTube videos, is responsive via email and super helpful with technical questions.

The system is sent via freight from California and it is clear that the freight drivers don't give two shits about how the packages arrive.  We ended up with one broken tube and a number of bent heat pipes.  Apparently it is really hard to ship these things because the replacements ended up broken as well and we took a refund for the broken glass.  Thankfully this system does not need all of the tubes to create hot water. (at least in AZ)...but I am getting ahead of myself.

The installation starts with building the aluminum frame - here it is in a very preliminary stage.


 Once it is put together you add the 40 gallon tank:


Plumbing this sucker ended up being a bit more challenging that I thought it would be.  I planned on using Pex because, well, I don't know how to sweat copper, but Pex can only handle temps to 180 degrees Fahrenheit. So we spent a lot of time considering how to ensure we don't overheat the water.  Our short-term solutions is to only use half of the tubes.  With half of the tubes our water is around 100 degrees F - this allows for a very comfortable shower.    

We did run into a few issues when plumbing this.  I had an older manual I downloaded from the Sunbank website and I purchased the items to insulate the lines based upon that manual.  In an email with James he gave me the newest manual and they had changed their recommendation about how to insulate - but I had already bought the items....so we tried it and learned why they changed their recommendation.

The old recommendation was to use ducting which you can see in this picture.  It is hanging away from the tank while we connected the hot and cold lines.


So we had everything connected, thread sealed and pipe doped - and then we tried to "slide" the duct up over the lines to attach it to the tank....and we created leaks by shaking the lines.  It was SO frustrating.  We had to cut off both lines, I had to figure out how to get the crimped Pex rings off and we had to redo the whole thing.

In the end we used the new recommendation of insulation and it looks like this:


From the front:


Of course we are in Northeast AZ and get full sun much of every day - we are going to add a couple more tubes and see how that changes the temperature of the water.  We know in the winter we will likely need all of the tubes.  James from Sunbank recommends a method of painting half of the tube and then rotating them depending on the time of year.  


I think we will go this route eventually - just have to find the time for this project!  For the time being using fewer tubes is working great!

A part that was not easy to find was a mixing valve.  I just received it yesterday.  This will protects people from scalding themselves when running the hot water inside.  Of course we know our hot water is only at 100 right now, but if we add tubes it will get hotter.  The mixing valve keeps the water coming into the house at 120 degrees by mixing the hot with the cold line.  I have some concerns about installing it because I will not know how hot it is getting so I am going to wait a bit and experiment with more tubes first.  

The mixing valve will be installed in this valve box:


It is not buried yet and the connections look like this:


It's hard to see, but this is where I have the shut offs for the hot and cold and I added a hose bib on our pressurized line.  The valve box will also be full of insulation for the winter.  

Overall this has been a challenging project, but I am so happy to be showering in hot water from the sun!  While this may not be the best system for all locations, it is certainly working well for us.  Many people use the Sunbank as a pre-heater to their conventional system.  We do not have a conventional system at all.  The test of this system (for us) will come during the winter!


Thursday, August 13, 2020

DC plumbing system


I'll start with a photo because I truly could not imagine how this electrical system went together until I saw it all mounted.  Thank goodness Husband has an engineering brain. I have previously posted about putting up the solar array and running the wires to the combiner box; setting up the batteries; and mounting the charge controller and inverter.  Once these things were in place Husband added a DC switch panel so that we could get our water system operational.  The DC switch is the black part that looks like no wires are running to it (that is because they come in the back).  So....DC appliances run directly off of the batteries.  The main appliance we will run with DC power is our delivery pump.  I made the following diagram of our water system to show the major components.  While I can't seem to wrap my head around electricity very easily, I do understand the plumbing!


While Husband was busy with electrical components, I plumbed the system.  As I previously mentioned our submersible pump (in the well) is also a DC pump and it has two 75 watt panels dedicated solely to that appliance.  The submersible pump fills a storage tank.  In order to have pressurized lines in the house you either have to build the storage tank up (like a water tower) to get a gravity system, or you have to have some sort of delivery pump.  We have a DC delivery pump and a pressure tank.  The pressure tank is basically a tank with an inflatable bladder.  The delivery pump pushes water into the tank and lines to the house to a maximum pressure and then shuts off.  When the pressure gets to a particular low point the pump turns back on.  The pressure switch is the monitor for how pressurized the lines are and it connects and breaks the circuit to the delivery pump when needed.  The only thing I left off of the diagram is a check valve that is installed directly off the discharge from the delivery pump.

Here is how it looked before I started putting it all together. The black tank is the storage tank and the grey one is the pressure tank.


And the final product!  I admit that I had to redo a number of fittings after the first attempt due to leaks.  On the second attempt I purchased the PVC pipe cleaner and used that on all pipes and fittings prior to using the primer and cement.  I had much better results and highly recommend not skipping that step!  No leaks!!


I also added a hose bib in case we need to drain the storage tank and a main line shut off.  The pressure switch and pressure tank took a little adjustment in terms of inflating the tank to the right amount and setting the switch.  We have the cut on at 15 psi and the off at 30.  This gives good pressure to the faucets and toilet.  My next job is to plumb the hot water line...this is only the cold!

Outside the PVC runs in the trench and then I switch to PEX before entering the house as that is how the rough in was installed when we built the house.  I really prefer PEX and am looking forward to completing the hot water loop with that instead of PVC. Also in the trench you can see the 2 inch pipe which is attached to the top of the storage tank.  When the tank is full the overflow runs through this pipe and is collected in an outside storage tank (which I will add soon).  We will use that water for irrigation.  


So just this week we were able to turn on faucets for the first time!  I've been filling buckets to fill the back of the toilet and hauling water for hand washing for quite a long time, but now the water is connected and we have indoor plumbing - cold only for the time being - but it is so very exciting!

Accomplishing long term goals

I just want to take a minute to reflect upon the feeling one experiences in accomplishing a long-term goal. I'm talking about taking on a task that requires a multi-year commitment, such as earning a college degree.  I found such a profound satisfaction in earning college degrees that I ended up with a doctorate!  But even that degree and the work that it took pales in comparison to building one's own homestead.  A degree has a major map, someone else has done all of the planning.  With a doctorate there is more creativity involved. The student has to conduct original research which is daunting and difficult in many ways, but still there are formulas and templates found in the work of those that came before you.  With this project there was no blueprint - I am not saying that others have not done this - I am saying that in making our homestead we had to consider our unique circumstances, land, location, etc.  We had to plan out and make decisions about everything and then implement these plans learning many new skills in the process.  Though we listened to others and read other accounts, we had to navigate many choices and find the path that met our circumstances.  I know that our homestead is unique.  While others might question decisions we made, we know that they are the right decisions for our time and place. 

In this picture, Sister is playing in the shade of our power plant.  This is a dream that started in 1999 before we were even ready to start a family.  To see the lights turning on in the house, to have water running from faucets and to have made that happen... to have designed the systems and put them together - it is such an amazing feeling.

The solar array is a beautiful, because it represents 20 years of dreaming, planning, thinking and doing!

Some of the components of this system we have owned for many years and they are finally being put into their final place in the service of our grand vision.  It's surreal.  As an example, our pump solar panels have been with us for 20 years.  Having them mounted and being able to easily switch them on and off without having to move them...well, it is easy to take it for granted, but when I step back and think of how far we have come from a raw piece of land to where we are today, I am very proud.  

Having an off-grid homestead where we can grow food, produce our own power and water, and live a very low cost life is liberating.  We've owned the cookie cutter house in the suburbs on more than one occasion and we walked away from it because we were not content being reliant on systems which are failing us.  In terms of water quality, energy production, food production, infrastructure, public health, and educational systems we felt we could "level up" to the point where we could seek rugged individualism and self-sufficiency.  As so we have - we often tell Brother (a passionate video gamer) that we are playing Minecraft in our real life.  We are actualizing a dream.  Yes, in America everything is for sale.  You can buy a life someone else designed, or you can take the road less traveled and create your own adventure.

From my perspective you should always follow your bliss.

Monday, August 10, 2020

Installing a solar array - it's all about the pole (and mounting rails, trenching, conduit, and wiring)

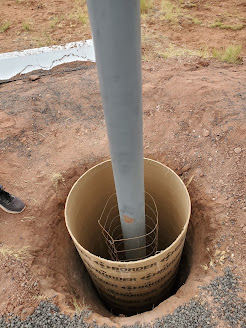
Who knew that digging a six foot deep hole 30 inches wide would be so difficult?  That is the precise depth and diameter needed for the proper installation of the 12 foot, 6 inch diameter, 200 lb steel pole which ultimately will hold the panels.  

We were hoping we could hire out this particular job - apparently a bobcat with the proper auger can do the job, but we were unable to find such a person/machine for hire.  In the end Husband tackled this job with a shovel and got the job done in only three days (soaking the ground at night so that it was easier to work in the morning)!  


Of course as he dug down the width became larger than 30".  Since the hole with the pole would be full of cement, any additional width meant additional bags of concrete (which I was NOT looking forward to).  He became a man on a mission and made a number of phone calls to find a construction company that sold concrete forms that would allow us the exact dimensions to fill with concrete.  One day he left really early in the morning and drove to and from Flagstaff to pick up the form.  We were pleased to see the form fit perfectly in the hole.

Thankfully between the time Husband started digging the hole and the time he finished it we purchased a tractor - one of the first jobs it helped us with was lifting the 200 lb pole into the hole.

The pole needed paint and we also added a rebar cage around it inside the form for added stability.

Next we built a frame around the top to hold the pole in place while adding concrete.


Next came my least favorite part - mixing and pouring 1 yard of concrete (that is 60, 60lb bags)  The pallet of bags looks like this.

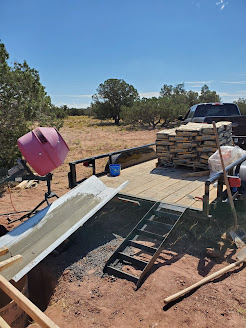
This is a grueling and horrible job.  Our mixer could mix two bags at a time.  Thankfully Brother was very helpful filling buckets of water to add to the mixer.  Husband and I took turns lifting and pouring bags all morning until my back quit on me.  I couldn't lift another bag when there were about 4 left.  I know Husband felt the same, but he was able to lift the last bags to finish the job.  We used the flatbed trailer as a prop for the metal slide - it actually worked really well in terms of the layout/logistics.


Despite the challenges we were able to mix and pour all 60 bags in one morning.


So, that whole event including digging the hole, purchasing and installing the form and pole, purchasing and picking up a pallet of concrete and pouring the concrete took a week (working every day).

Next we installed the gimble and the mounting rails.  Again the tractor was a great help because the "strongback" was heavy and had to be lifted above our heads and held in the exact position to install the hardware.


The rails were easy to add once the main support was in place.


I suppose the next step is obvious - put up the panels!


After that came another hard job - we rented a trencher from Home Depot so we could bury the lines.  That machine is really heavy and you have to pull back on it when it is working - I think it was faster than digging, but it was still work.  We tied a rope between the two points to ensure we stayed on the path.


Finally, we ran all of the electrical wire in conduit and grounding wire.  We had previously pounded in grounding rods (8 foot long copper poles).  One of the grounding poles is pounded in near the base of the pole. We had planned all needed wire and conduit - it is so good to see all of the supplies we collected be put into place!


Putting wires in conduit is a bit of a time consuming project. It's best to lay everything out on the ground get all the wires through, then cement the conduit together before dropping it into the trench.  Finally - the wires are connected to the combiner box!  This brings the power into the building and into the components I previously mentioned.  These steps took us about 1 and a half weeks to complete.


SO....these productive weeks have brought us to the point of having power connected to the batteries.  In my next post I will delve into our plumbing and our DC delivery pump.  It is really a dream come true to see this all coming together!

Solar system: Setting up components

A lot of planning goes into a solar system.  I am very fortunate to have Husband who loves to tackle technical problems and who has spent many hours learning and planning our system with the help of the internet, YouTube and the good people at Northern AZ Wind and Sun!  As I mentioned in previous post we have been collecting all of our components over the past many weeks and are due to make our final trip to Flagstaff, AZ in the near future to obtain the final components which include the pole upon which the solar array will be mounted and the frame which will hold the panels and mount to the pole.  

However there are many small steps towards this large goal of having a self-sufficient home and figuring out how to organize and mount all of the components requires a good deal of work.  The batteries are the heaviest and most bulky component.  Batteries will store the energy from the solar panels so that we have electricity overnight and on cloudy days.  We ended up using Costco golf cart batteries.  They are very inexpensive and should last 5-7 years.  They are lead acid batteries so you have to check the fluid levels and keep them filled.  So, after figuring out where the batteries will be placed...


...we started to devise a system for mounting the components.  The largest and heaviest part is the inverter which weighs a whopping 42 pounds! An inverter is necessary because it inverts DC power (from batteries) to AC (standard plugs/outlets in the home). This inverter is a 3000 watt inverter that can be used as a charger (can charge batteries from a generator) as well.  This is a good feature in case we have a long streak of cloudy days.  


Wanting to utilize materials we have laying around, we decided to use scrap steel as the background for the components.  Pieces of wood and plywood will be bolted to the steel to create a sturdy area for everything to connect to.  Here is an early visualization of how things would be laid out on the surface.


And here are the steel pieces with wood for mounting the inverter, mounted to the back end wall (above the batteries -  though due to the weight of the inverter, it is recommended that it not be placed directly over the batteries).  


Next we mounted the inverter.


The next largest component is the charge controller.  The function of this machine is to take in the DC power from the panels (which is changing depending on the intensity of the sun) and adjust the power going into the batteries so that they receive consistent power and so that all batteries in the bank remain equalized in terms of how full they are.   I am sure there is much more to this - I am giving you my limited understanding of how this works!  


The charge controller is placed between the combiner box (which combines the power from all of the panels) and sends that energy to the batteries.  The combiner box is a component that mounts outside and receives the cords running from the solar panels.  The combiner box also has access to the inside to send the energy to the charge controller.  


These preliminary steps were taken prior to setting up the solar array (by mid July).  In my next post I will detail the process of setting up the array and connecting them to the combiner box and the rest of the components inside the garage.  Because we have been working every day I have not been able to write up our progress!  I am going to try to bring you up to date....